There is nothing tricky to host a laravel project on digital ocean. It is as easy as you are hosting your laravel project on you PC with Linux operating system. If you are using the git then it become more easy to host, maintain and update your project.
Setup MySQL On Droplet
First open this file to get your mysql database root user's password
cat /root/.digitalocean_password
Creating database
Create database < database name >
Now go to your laravel env file and update the database name, user name as root and password you copyed from the digitalocean_password file.
 |
| Digital Ocean + Laravel |
What you need is,
- A Digital Oceon account, if you don't have any account just go to this URL " Digital Ocean Account Create " . After filling every information you will get 10$ as you trial credit ( and after you spent 25$ it will give me 25$ so you are buying me 3 months of hosting )
- Second you will need a laravel project with git. ( I recommend GitHub for opensource and git-lab for private projects , this are my own opinions ) Now, I am assuming that you have basic knowledge of git command like, push ,pull and clone. If not just checkout for it.
If you this two things we are ready to go.
First we have to create a Digital Ocean droplet for hosting. Digital Ocean droplet is sort of virtual private server which gives you a dedicated system having operating system of your preference, and space and ram you have selected. It you gives ssh to login to your droplet.
To setup you droplet Login to your account
 |
| Digital Ocean login |
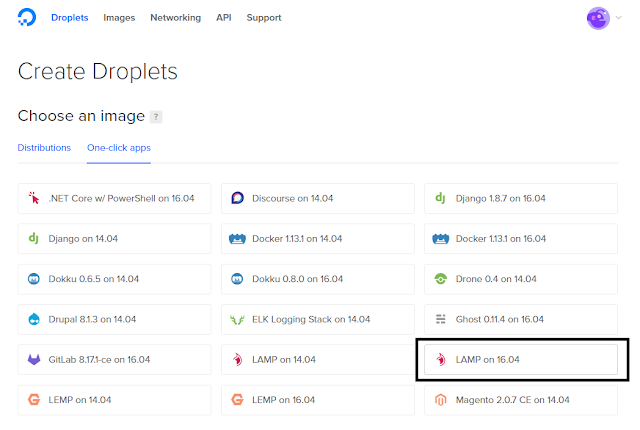
Create Droplet one click app lamp stack with 16.04
 |
| Droplet Images Digital Ocean |
Select Droplet Size and region of data center
 |
| Digital Ocean Droplet Size |
As you done with this it will create a droplet for you
So your droplet is ready. Click on Droplet name it will give a dedicated IP address
 |
| Digital Ocean Droplet |
Now you need something like putty to access droplet via ssh
Login to your droplet with you ip address and password you set during the droplet setup
 |
| SSH with putty |
This is the time to setup your laravel project on your droplet
Install git on your droplet
apt-get install git ( That's it )
go to the
/var/www
here clone your project from the remote git. I am using gitlab so i will use
git clone http://gitlab.com/mchampaneri/*****.git
 |
| Clone repository on Droplet |
Run This command to get composer on you system
curl -sS https://getcomposer.org/installer | sudo php -- --install-dir=/usr/local/bin --filename=composer
After cloning run command :
composer install
 |
| Composer install |
Sometime happens that the package you are using have php extension dependencies , so composer will give errors. Don't panic here you have to read error, it will say what is missing in the error just install that extension in you droplet and every thing will work fine.
If you stuck somewhere just ask in comment. I will help you.
After this you have to change owner and group of some folders so work the laravel project fine in Linux. If you are familiar with Linux it will like nothing for you.
Before doing i like to explain this.
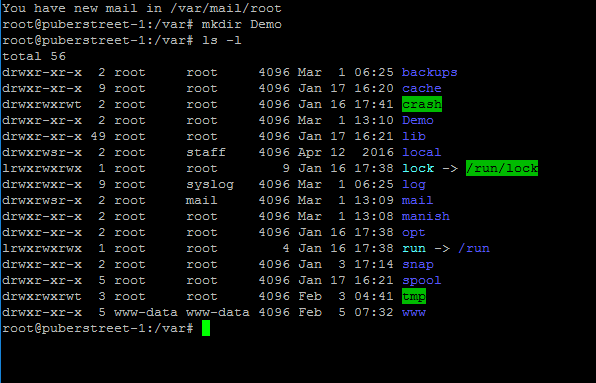
Linux maintains an ACL ( access control list ) for each file and folder. By default the owner of file/folder is who created is and default group is group that user belongs
You can get owner and group by command ls -l it gives ACL information about file/folder.
 |
| ACL in Linux |
Change group of the storage folder with command :
chgrp -R storage www-data
Change owner of the storage folder with command :
chown storage www-data
Change folder mode with
chmod 755 storage
 |
| Chang group and owner of storage folder in laravel |
Setup MySQL On Droplet
First open this file to get your mysql database root user's password
cat /root/.digitalocean_password
Now Login to mysql
mysql -u root -p (press enter)
Write or just past the password when it ask for password
Creating database
Create database < database name >
Now go to your laravel env file and update the database name, user name as root and password you copyed from the digitalocean_password file.
My suggestion
I will suggest you to put storage in the git ignore when your development data and real data are going to be different , like if you are developing and blogsite your developement data will surely not going to be in your site when you deploy it.
and with this , you have successfully deployed you laravel project on the digital ocean
DigitalOcean is best VPS provider for Laravel application. But managing it's server does require system admin skill. But some providers like Forge and Cloudways are the best for hosting Laravel on DigitalOcean.
ReplyDelete